This question has been on my mind a lot lately, particularly as I scroll through my social feeds of perfectly coiffed, curly-haired women. Some naturally curly heads are so overworked with styling techniques and products that I find myself wondering if their hair might be more beautiful if they simply let it be.
My own product preference for a wash-and-go is two. A leave-in and a gel. Each product serves a distinctive purpose. Leave-in = moisture. Gel = style and hold. Maybe I will try a volumizer in there one day, but for now it’s not needed. Simplicity and speed of routine are two of the main reasons I embraced my natural curls.
Then I look at the latest curly hair routine video and it goes sometime like this: leave-in, soft hold styling cream, strong hold styling cream, soft hold gel, hard hold gel, finishing oil, and hair spray to set it all. I totally get product experimentation, but if you have to use that many products in your hair, I’m pretty sure you’re not using the right ones. No product will give you hair that you do not have.
I suppose we, the curly hair community, deserve some of the blame. We’ve been so adamant and vocal about wearing our hair in its natural state that companies are lining up to cater to us. The product choices today are astounding – a good problem to have!
But let’s get back to the basics and remember why we wear our hair naturally curly in the first place. For me, it is simplicity, acceptance and freedom. Your reasons may be different, but for all of us, the beauty of our hair is in its uniqueness and imperfection. There is grace in the untamed lion. The same is true of our curls.
I wish the answer was a straightforward yes or no. The truth is, it depends primarily on the environmental conditions where you live. Through trial and error, I have learned that styling products with high amounts of glycerin definitely do NOT work on my hair in extremely humid conditions. (I’m sad about that, because a LOT of great hair products contain glycerin.)
I live in New Orleans, and like many curly girls here, I had completely written off curl definition and hold in the extremely hot, humid summer months. When I first moved here from Atlanta, I had very long hair, but I never wore my curls out. I had too much hair and it was too hot, so I always wore buns or braids. Then life happened and I cut my hair into a pixie. This past summer was the first time I’ve had to deal with making my curls look presentable in extreme humidity, so I began paying attention to ingredients.
I noticed that whenever I used a styling product with a large concentration of glycerin (in the top five ingredients), my hair went wild. Day 1 hair was always ok, but after that the frizz was out of control, even with deep conditioning. I’d always heard that glycerin was a good humectant for curly hair, that it balanced the moisture levels in the hair and kept the cuticle smooth. Turns out that’s true, except in extremely humid or dry climates. I found this info from NaturallyCurly.com:
While glycerin has an immense ability to attract moisture to the hair it also has the reverse effect. Everything is about balance. On extremely humid days too much moisture can be attracted to your hair causing the hair to swell and frizz. However, on low humidity days (cold, dry days) where the surrounding air is more dry than your hair, the opposite occurs.
This explains why, when I lived in Atlanta, which has lower humidity than New Orleans, products containing glycerin made my hair very smooth and defined. Here in New Orleans, those same products don’t work.
Glycerin is a humectant, which means it attracts moisture from the environment to your hair to keep it moisturized. However, if the air is very moist, the humectant can attract too much water to the hair, causing the hair shaft to swell and the cuticle to lift. Raised cuticles = frizz.
When I turned to glycerin-free products, or those that listed glycerin far down in the ingredient list, my hair behaved completely differently. I had noticeably less frizz and more defined ringlets.
This, my friends, is why I’m so thankful there are so many curly hair products on the market now. One product definitely does not serve all needs. It really is about trial and error, paying attention to your hair, and knowing what’s in your products.
What’s your relationship with glycerin? Love it? Hate it? Let me know in the comments below!
Sooo… I decided to dye my hair purple. I don’t know if it was the Prince concert I went to recently, the fact that purple is my favorite color, or that I’ve been completely bored with my hair lately, but I thought adding a subtle purple tinge would give just enough “wow” to keep me from chopping my hair into this pixie cut (cute, right?). Welp, I was wrong. Here’s sort of what I was going for:
Sadly, I now realize this is probably more of a fuchsia. (Source: glamradar.com)
Here’s what I got:
I used N’Rage Purple Plum demi-permanent hair dye, chosen because the helpful lady at Sally Beauty Supply told me she’d seen this color on a brunette with a similar hair tone as mine, and it looked “nice in the sun.” Don’t get me wrong, I did not expect to look like this (which is still pretty), but since my hair is a medium shade of brown with some natural highlights, I expected just a little more, well… purple.
Instead, I got blue-black-purple. Depending on the light, much of my hair was nearly black, the tips were dark blue, and my roots, where I had purposely not applied dye, were my natural medium brown. #fail.
Whenever I color my hair at home, I know it’s a roll of the dice. This time I lost – miserably. So I immediately googled how to safely remove hair dye without using bleach. I came across the vitamin C method, which is supposed to lift demi-permanent hair color 1-2 shades. Here’s what it called for:
One or two 1,000 mg vitamin C tablets, crushed
A clarifying or dandruff shampoo – something not too gentle, cheap is ok
Plastic shower cap
20 minutes
So I got to work, figuring I’d have nothing to lose. For my amount of hair, I crushed three tablets in a plastic bag with a hammer and mixed this well with my usual amount of clarifying shampoo. After letting warm water run over my hair for a few minutes to open the cuticle and let any access product run off, I wrung out my hair and lathered as usual with the shampoo/vitamin C mixture.
I piled my hair on top of my head, covered it with the plastic cap, and let it sit for about 25 minutes. I then rinsed thoroughly and applied a deep conditioner for about 20 minutes since clarifying shampoo can be harsh.
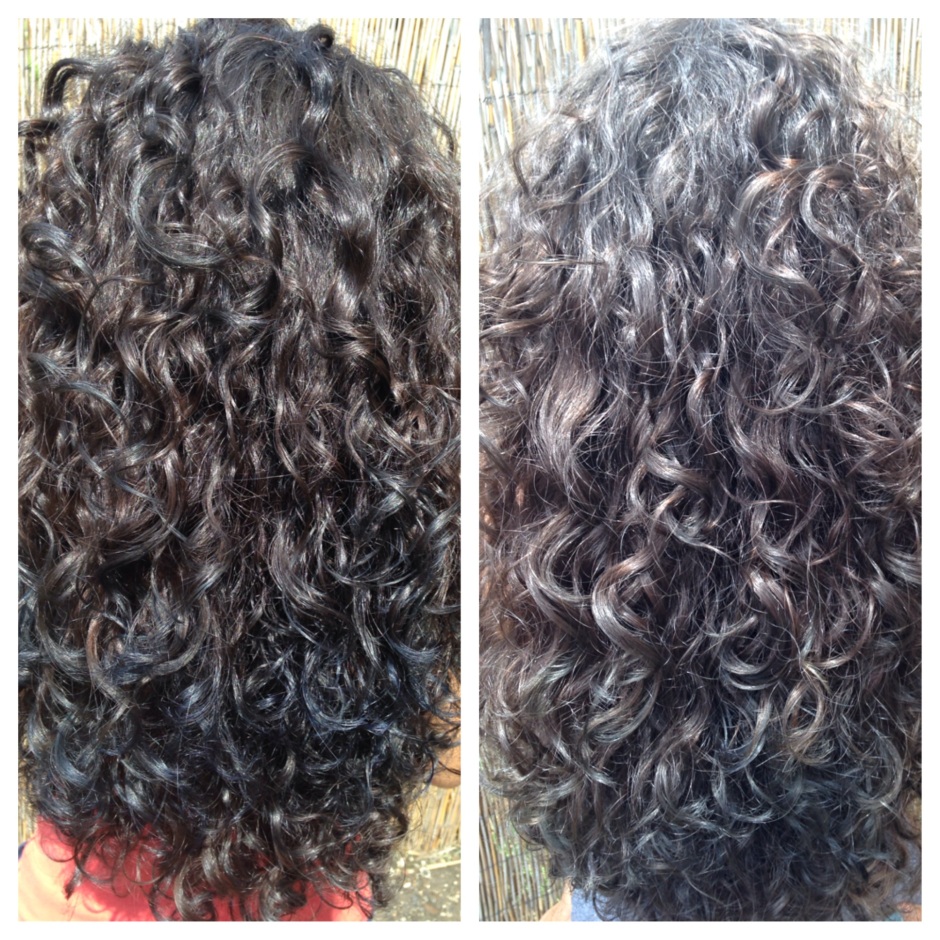
The Results:
Left: after washing only with clarifying shampoo. Right: after using the Vitamin C method
Although the pictures above were taken in slightly different light, you can see the movement of the blue/purple dye further down my hair after using the vitamin C method.
The shampoo/vitamin C mix took out A LOT of hair dye, more than with my usual moisturizing shampoo. The first time I tried this method, I noticed a very subtle difference, but not much. I let my hair rest, then a few days later I tried it a second time, and when my hair dried, I began to see hints of my natural hair color. This method is definitely not a one-shot fix, but if your hair is strong enough to handle multiple treatments back to back, it will remove temporary color more quickly than normal shampooing. Plus, it’s more gentle than bleach, which can strip curly hair of it’s natural oils and change the curl pattern.
It’s now been 10 days since I dyed my hair “purple.” After two vitamin C treatments, two normal shampoos, and one day at the beach, I’d say the color is about 70 percent gone. That’s not so bad considering it normally takes demi-permanent dye between 3-6 weeks to wash out.
Once the color is completely gone, I’ll likely head over to my stylist for a complete color re-do. Maybe I’ll add honey highlights, so I can try purple again over lighter hair. I’ll use a different brand, of course. 😉
I mentioned in a previous post that I love a good curl refreshing spray. However, I don’t like to spend a lot of money of them for two reasons: 1) I go through them like water and 2) half the time they don’t work! So I’ve concocted my own curl refreshing recipe that works like a charm on my 2nd, and even 3rd, day curls. Here are my ingredients:
Coconut Oil, Leave-In Conditioner, Water
I like to use a light leave-in like Giovanni for this spray because it blends easily with water. The leave-in softens and conditions hair, coconut oil makes it shiny and helps moisturize, and of course water is the ultimate natural curl activator.
Here’s approximately what I use in a 2 oz bottle (I make it in small batches so I can put it in my purse or travel with it).
1/8 leave-in conditioner
One squirt (maybe a teaspoon) of coconut oil
Fill up the rest of the bottle with water
Shake (the bottle) rigorously until the ingredients are well blended. The goal is to achieve what I call “slippery water,” so you may need to add more water or conditioner until you get just the right formula. You want the mixture to be thin enough to spray through a nozzle, but have enough “slip” to coat your locks.
When I’m ready to use it, I flip over my limp, dry curls and shake them at the root to loosen them up, then I spritz the refresher onto my hair until it’s damp all over. I flip upside down again, and gently scrunch my hair upward. Most of the time I let my hair air dry, but you could also use a diffuser on low heat if you’re in a hurry. Et voila!
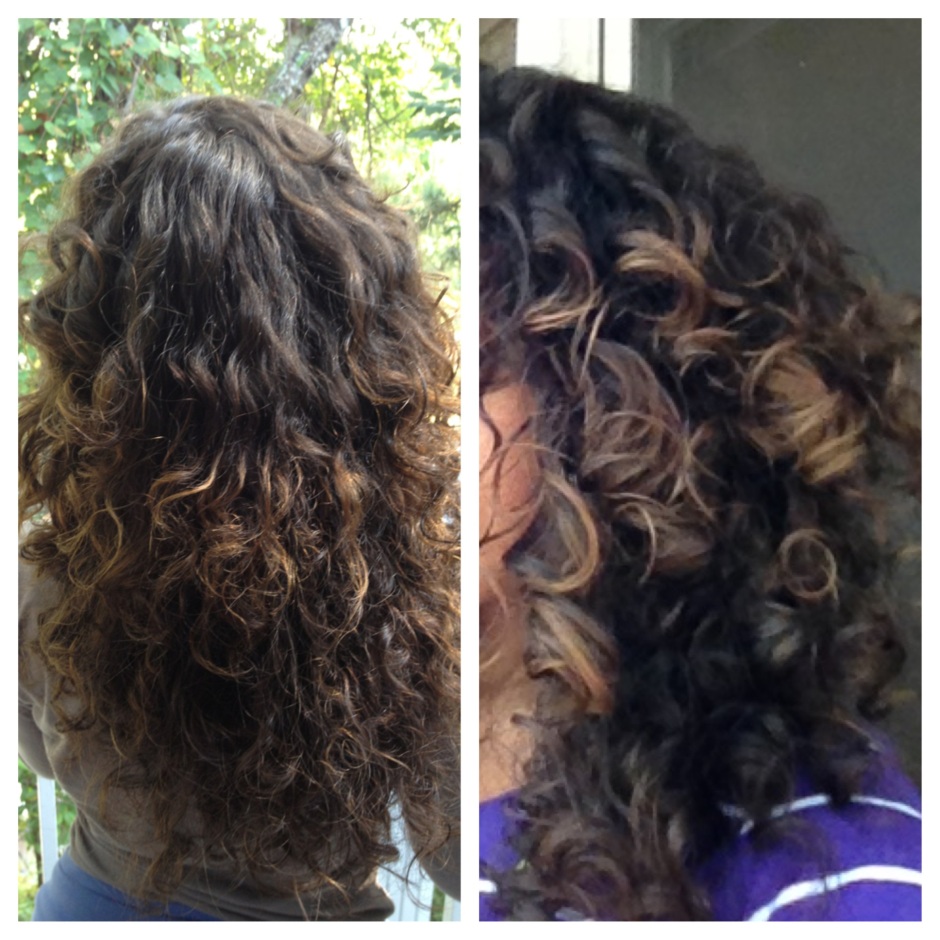
Before and after
Smooth, frizz-free curls. Do you have a favorite curl refreshing spray or make your own?
Sad. Lifeless. Limp. But BLONDE. These are the words to describe those sections of my hair that I highlighted last fall. We all know, we’re always told, that bleach kills your curls, but many of us do it anyway because of the way the color makes our curls pop. I’m definitely guilty. When I get bored with my hair, I either cut or color, and you can only cut but so much and still have hair. So when I can’t fight the mighty light (color), here’s what I do to beat the bleach.
What Bleach Does to Hair
First, let’s look at how bleach actually affects hair (I did some research on this one). When bleach comes into contact with the hair shaft, it causes causes the protective cuticle scales to lift and separate, allowing the chemical to enter the cortex and remove pigment. The longer you leave bleach on your hair, the more your cuticle is lifted, and the more pigment is removed. This causes hair to become more porous, and the cuticle is no longer able to do its job and lock moisture in. That’s why hair becomes so dry and brittle after using bleach. Curly hair is already more porous (and dryer) than straight hair, so the process is even more damaging to curly locks, and it’s irreversible. But it looks good!
Protein Treatments
Hair is composed mostly of protein, and when you put bleach on your hair, it breaks down the proteins to remove pigment. So it is ESSENTIAL to try and replace the lost protein in order to regain hair strength and prevent breakage. Personally, my favorite protein treatment is
Image source: Target.com
Palmer’s Coconut Oil Formula Deep Conditioning Protein Pack. I used this 1-2 times per month, in addition to my hot oil treatments, which I’ll discuss in a minute. I use this product because 1) I trust the Palmer’s brand, 2) it’s affordable, and 3) my hair loves coconut oil. It only costs $2-$3 a pack, and with the amount of hair I have, I use two at a time. There are a ton of other protein treatments out there, ranging from ApHogee reconstructive treatment for severely damaged hair (I haven’t tried this yet, but I hear good things about it, with the exception of the smell), to all-natural egg or avocado mixtures (there are many, many recipes on the web). The point is, put protein back in your hair – regularly!
Hot Oil Treatments
Image source: coconutoilexperts.com
We’ve already discussed how bleached hair is unable to retain moisture because of the lifted cuticle, so we’ve got to lend our hair a hand. The only true moisturizer is water, which curly hair tries to grab from the air (hello frizz), but we can help it by coating our strands with a nutrient-rich, natural oil that strengthens hair and helps prevent water from escaping. My hands-down favorite hot oil treatment is done with coconut oil. Its small molecular structure allows the fatty acids and vitamins to penetrate the hair shaft so your hair can absorb all the goodness (can you tell I’ve been studying this?). My second favorite oil to use is extra virgin olive oil; it’s just as good on your hair as it is in your body.
Protect Those Ends
From experience, most of us know that the ends of the hair are the oldest, most fragile, and most prone to breakage. Split or thinning ends will ruin your curls, so they must be protected like the life of your hair depends on it (well, it does). I always put extra moisturizer and oil on my ends, I NEVER brush my hair in its dry curly state, and I ALWAYS re-moisturize my ends at night and tuck them away in a pineapple or loose bun. I’m a lot more relaxed about this when I don’t have highlights, but when I do, I’m militant!
Those are my basic bleach-battling techniques. What are yours?